
Alpine Club Forum
What did you do with your Sunbeam Alpine today?
Posted by Skye


 |
Mar 14, 2022 05:40 PM
Joined 5 years ago
132 Posts
|
Thanks,
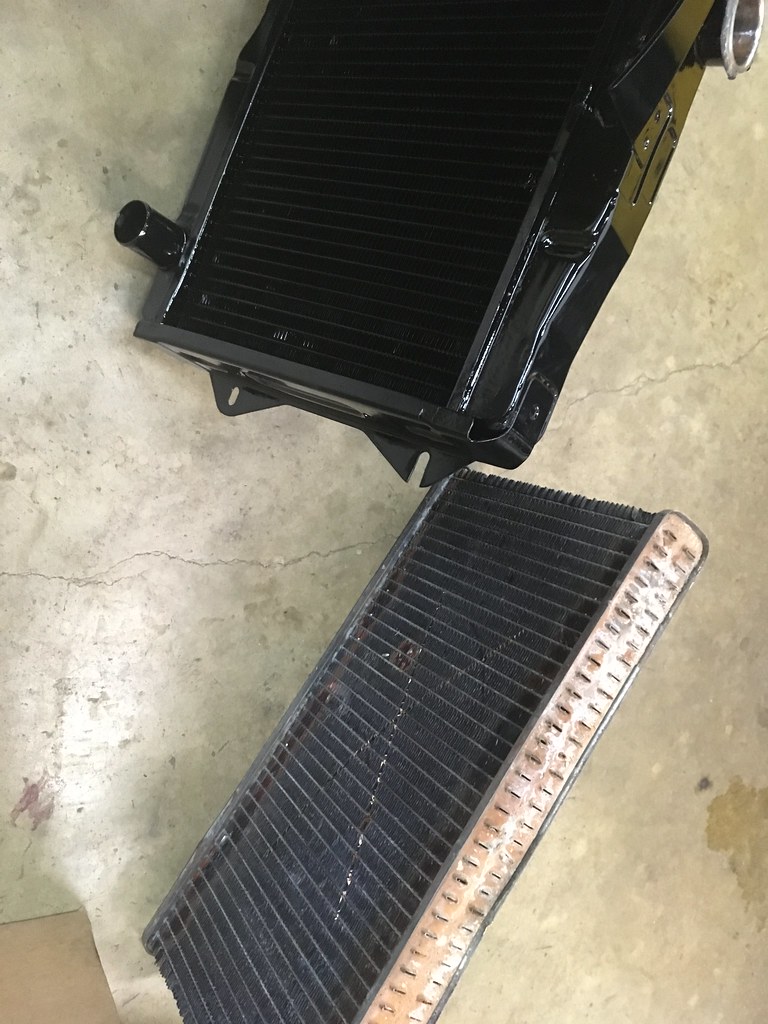
Radiator was cleaned but they said it was too old/fragile to repair.
Did new top/bottom hoses a year ago, so those are all good.
Looking at my options.. a re-core is about $500
Looking to see if there is an aluminum replacement instead.
Radiator was cleaned but they said it was too old/fragile to repair.
Did new top/bottom hoses a year ago, so those are all good.
Looking at my options.. a re-core is about $500
Looking to see if there is an aluminum replacement instead.

TomSunIVGT
Tom McVicker/T
Bay Village, OH, USA
Sign in to contact
|
Mar 15, 2022 05:42 AM
Joined 10 years ago
59 Posts
|
Radiator
I've found sometimes supplies like Sunbeam Specialties, Campbell CA and Classic Sunbeam, Inc. Ossining, NY have parts not always listed in their catalogues. A call to them may be helpful, MOSS Motors as well - although their catalogue doesn't seem to include SBeams. Hemmings may have stray listings of parting out.
I've found sometimes supplies like Sunbeam Specialties, Campbell CA and Classic Sunbeam, Inc. Ossining, NY have parts not always listed in their catalogues. A call to them may be helpful, MOSS Motors as well - although their catalogue doesn't seem to include SBeams. Hemmings may have stray listings of parting out.
|
|
Mar 15, 2022 06:26 AM
Joined 5 years ago
132 Posts
|
Thanks Tom,
I did call one of the vendors so far and may check on the other two as well. I am still on the fence between doing a re-core of mine or trying to find an aluminum one to fit.
The car is a nice looking driver, but not 100% original.
I did call one of the vendors so far and may check on the other two as well. I am still on the fence between doing a re-core of mine or trying to find an aluminum one to fit.
The car is a nice looking driver, but not 100% original.
about 3 weeks and 1 day later...
|
|
Apr 6, 2022 11:07 PM
Joined 5 years ago
132 Posts
|
Went with a re-core of my radiator thinking I wouldnt have any fitment issues.
Came back within a week and looked great.
The problem was the filler neck was just a little bit low and close to the bodywork.
I needed to notch the mounting holes a little bit to raise the radiator and added one extra washer on the two top mounts to space it back.
Taken it on a few short rides and all is looking good. Weather is cold and I only went a few miles so the temp gauge never went up much.
Planning on a longer drive to a cars & coffee on Sunday.
 Greenwood, SC, USA
Sign in to contact
1964 Sunbeam Alpine "Big Red GT"
1967 Sunbeam Alpine "Blue Boy" 1967 Sunbeam Alpine "Commodore Blue" |
Apr 7, 2022 10:53 PM
Joined 9 years ago
138 Posts
|
Steve, your radiator looks really nice. Hope it fills the bill - Cool Alpine
DanR
Keep'em-on-the-Road
'67 SV Commodore Blue Restored & Modified 2.8 V6 FORD; T5; A/C; Electric Power Steering (EPS; REAR DISC BRAKE KIT
V6 CONVERSION COMPONENTS available & STRAIGHTBACK HEADERS for your V6 Alpine
Tiger2Dan’s Link: http://danr.mhartman.net/
PDF file on Converting your Alpine: Kits available
https://docs.google.com/document/d/13vKZ9JhB0vO8p2PrMl1x1qfCxh17xJIg_KCIo7HeFok/edit
?ts=5a51997d
|
|
Apr 10, 2022 04:00 PM
Joined 5 years ago
132 Posts
|
Attended a local Chicagoland car show and ran into a really nice looking Tiger..
First time seeing another similar Sunbeam at a show where I brought my car.

Here is a link to more pictures of the event
https://www.flickr.com/photos/ernestovumbles/albums/72177720298012088
First time seeing another similar Sunbeam at a show where I brought my car.
Here is a link to more pictures of the event
https://www.flickr.com/photos/ernestovumbles/albums/72177720298012088
about 1 week and 5 days later...
|
|
Apr 22, 2022 07:51 PM
Joined 5 years ago
132 Posts
|

|
Gumby-Alpine
Richard Atherton
|
Apr 23, 2022 04:33 PM
Joined 4 years ago
20 Posts
|
Well, here's an update to my 64 Series IV Alpine. Front calipers are off and out being rebuilt. Should get those back this next week, and will be ready for some caliper paint (Thinking red). Finally got the front hubs done. New bearings, seals and studs for the steel wheel hubs. Removed the wire wheel ones, moved the brake rotors over to the steel wheel hubs, and installed them on the car. Test fit the Rota 15" wheel with Douglas 195/60-15 tires. Looks sharp! Car is up on my Quickjack, and the car has no front valance so any clearance issues are still unknown at this point in time, but there's shouldn't be any.
Missed out on buying a 1725 engine and transmission in California, because my friend with his Semi Truck was completely full and had no room for it on his last trip. Would like to swap to a 1725 and full synchro, so if anyone has a good spare on the west coast, let me know.
Got a Series V rear axle with steel wheel hubs for free (Great Price), which was nice and clean with no gear slop at all. Tore it down, pulled the hubs off with an awesome tool I built based in part on designs from one of the Tiger sites. Worked beautifully on both the steel wheel hubs, and the Wire Wheel hubs. Anyway, I pulled the axles, pressed off the old bearings, and pressed on new ones. Axles are perfect. Found it did not have the two special dowel bolts used to locate the brake backing plate. Removed the differential pumpkin and found thatt the previous owner had already replaced the ring gear bolts (Crown Wheel in British), AND had changed the gear set to the 3.70 set from Holland, which I wanted to do anyway. That saved me about $680. Wear pattern on the gears is perfect. Going to remove one ring gear bolt (Rootes part number 9003197), to make sure of two things, 1, that bolts are not bottoming in the holes. (The 3.70 ring gear is thinner than the 3.89 or the 4.22 rings gears are, and the threaded hole must be bottom tapped (Thread all the way to the bottom of the hole), and because the hole has to so shallow so it doesn't go through to the gear teeth, I want to make sure that the bolts are NOT bottoming in the holes. I will run a longer 3/8"-24 bolt to see how many turns I get before hitting bottom, then re-insert the correct bolt and see how many turns it goes in before getting tight. As long as it is a couple of turns less, then I know that it is not bottoming out, and that the Torque settings will be accurate. 2. To make sure that Red Lok-tite was used. If all is good, then reassemble the pumpkin with a new gasket back on to the axle axle housing. Inset the axles with the new bearings (Series V bearings have an integral Oil seal on the inside, and an O-ring seal on the outside).
My son and I removed the the Series IV Wire wheel axle housing from the car. Just caked with dirt, dried mud, and some kind of organic matter similar to Dogwood tree stuff. Got it up on the bench, there was no oil in it, and it has a fair amount of slop between the ring and pinion. I pulled the hubs off with my puller, and removed the backing plates and axles. Axles are in excellent shape, oil seals were shot, and I assume the bearings are bad as well. Completely rebuildable of course. Swapped the backing plate bolts with the Series V axle so I now have the correct 2 dowel locating bolts per side.
I did not remove the pumpkin on the series IV axle since there's no point because I will not be using it. I will be using the brake drums from the IV on the V as they are the same and the free V axle didn't come with any. Will blast them clean, and paint Red to match the front Calipers. Will install all new brake parts, springs, shoes, wheel cylinders, clips, and rubber boot
My son and I also removed the leaf springs and shackles from the car so I can overhaul them as well with new nylon buttons, strap rubbers, and bushings. I can do the bushing on the Hydraulic press easy enough. and have devised a way to press the one in the rear of the frame with two plates, a central grade 8 threaded rod, and essentially "pull" the new one into the frame. Digging out the old one will be labor intensive, but do-able. Once the Springs are back in, New rear Shocks installed at the top mounts, the completely rebuilt series V axle goes in. Bolted up, and done.
New brake lines throughout, with braided SS flex lines. The only issue, will be the E-Brake actuating system on the back of the axle. The Free series V did NOT come with it, and the series IV mounts in a completely different way. That bracket is not present on the back of the V axle, so I will need to figure that one out.
Anyway, Off to check those bolts, install the pumpkin, and install the axles and backing plates today.
If any one is interested, I have two 25 spline axles (series 1 through 4) in great shape ready to be rebuilt, 5 wire wheels with 4 hubs 2 rear (series 1 through early IV), and two front hubs to sell as a complete conversion package, and a series 1 through early IV rear axle housing, backing plates, diff pumpkin, and those axles if you want the whole package..... Let me know !!
Richard in Lynnwood Washington.
|
TomSunIVGT
Tom McVicker/T
Bay Village, OH, USA
Sign in to contact
|
Apr 25, 2022 01:40 PM
Joined 10 years ago
59 Posts
|
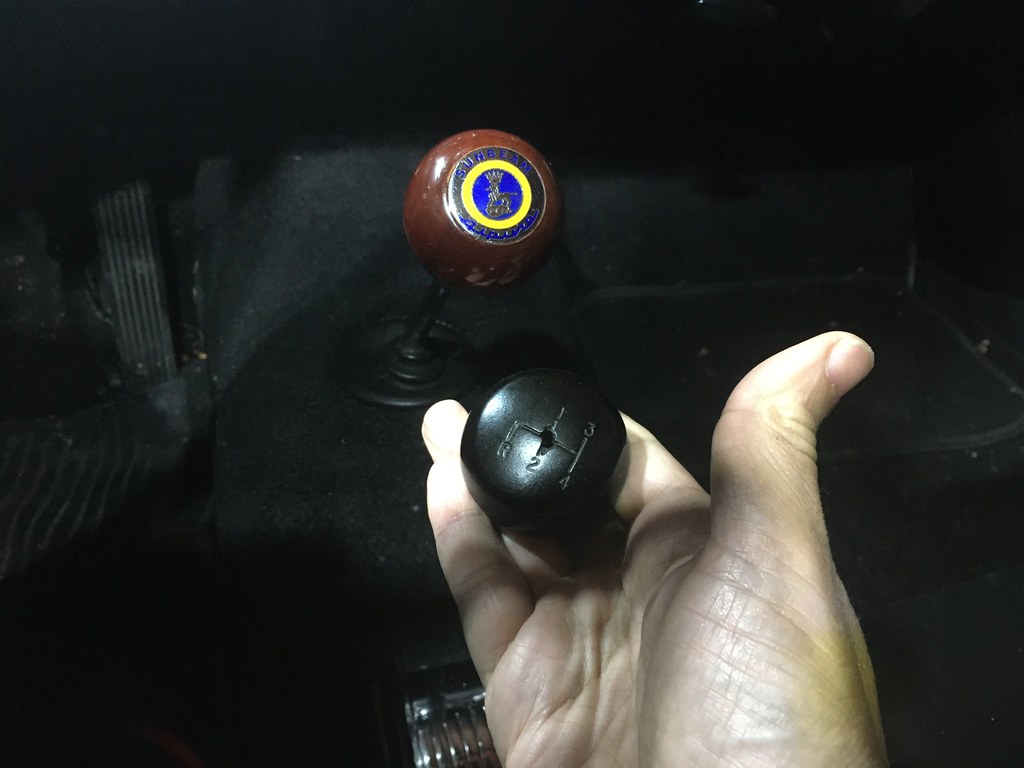
“New Wood Shift Knob”. Agreed. It is a handsome addition that doesn’t scream aftermarket. I’ve enjoyed mine since 1965 as the first accessory I purchased. FWIW, several months after install I thought the gearbox developed a vibration noise. Happily it was the threaded metal insert in the wooden knob that slightly loosed. I secured the fitting to the shift knob with three very small wood screws.
Attachments:
D7A2D69C-D377-4AED-B226-729E2A6FBA12.jpeg 44.8 KB

about 1 week and 4 days later...
|
|
May 7, 2022 12:43 PM
Joined 5 years ago
132 Posts
|

|
Gumby-Alpine
Richard Atherton
|
May 7, 2022 10:54 PM
Joined 4 years ago
20 Posts
|
Update to the 3.70 ring gear (Crown Wheel) bolt issue.
The bolts were the stock length, Grade 8, but not Shouldered as they are supposed to be. The Shoulder takes the side loading of the ring gear's torque and applies it to the side of the hole in the carrier. If there are threads there instead of a solid shoulder, the threads can compress and deform, or wear corresponding thread groves in the smooth carrier hole, Or Both, causing potential side (rotational ) slop of the ring gear. Ordered the correct shouldered grade 8 bolts from Rick at S.S. along with new3 woodruff keys, and nuts for the axles.
Lok-Tite was used by the previous owner. HOWEVER...and this is a big issue...The bolts WERE bottoming in the ring gear holes. While torqued to spec probably, The ring was tight against the carrier, But that was pure luck because 4 of the 8 bolts were tight and lok-tit'ed in place, I was able to slip a thin piece of paper behind the head of the bolt and the surface of the carrier the bolt was supposed to be pressed against. Those 4 had bottomed before ever getting tight against the carrier. They were very Lucky. The 4 were in every other hole, evenly space around the ring gear.
New bolts arrived, and a quick check found them to be too long for the 3.70 gear set. WARNING! Anyone using or considering the 3.70 gear set, MUST shorten the stock bolts to avoid the above problem.
Removed the original bolts (one at a time for this entire process). I used a die grinder on a 3" grade 8 3/8-24 bolt and cut an angled grove in the end of it to act like a tap or thread chaser to clean the threads of the previous Lok-Tite. The bolt had a typical taper at the end, so I ground the end of the bolt flat, grind off the bottom three threads so it was full length bottom tap style. It worked perfectly cutting out the old Lok-Tite. Used air to blow the hole clear of debris (wear Goggles!). The 3" bolt on the first hole, would go in 7 and 1/2 turns before bottoming out in the hole. Now we know the depth of the hole. The New Shouldered bolt from S.S. also went in 7 and 1/2 turns and bottomed out, leaving a perceptible gap between the head of the bolt and the carrier. Obviously, this won't work.
I took one of the new shoulder bolts, held it tight in Vise-Grip pliers jaws, and went over to my 8" bench grider, and ground off the taper, making it flat on the end, but found that it still bottomed in the hole. Continued grinding and testing until I got it down to 6 to 6 and 1/2 turns before getting tight. Now they are not bottoming out, and are fully engaged. Torquing to 50 lbs (WSM lists 45-55) only required about half a turn, which meant it was still clear of bottoming out. I did this one at a time all the way around, using Lok-Tite Red on the final fitting and torquing.
I found some variances in the threaded depths of the ring gear. Some only had 7 turns, so the bolts for those holes were ground to 5 3/4 to 6 turns.
One final internal cleaning of the rear end housing with brakeklean spray and rags soaked in brakeklean, and it's ready for assembly.
I ordered new nuts for the axle, but decided I wanted full Grade 8 Nyloc nuts instead. Ordered some off of Ebay. BEEFY Grade 8 nuts, but they are too tall, and the nylon locking ring will never engage. Will see if I can find some shorter grade 8 nuts. The one from S.S. appear to be standard grade, which at this size will probably work just fine.....But I'm picky....And so it goes...
Richard in Lynnwood WA.
|
Gumby-Alpine
Richard Atherton
|
May 7, 2022 11:03 PM
Joined 4 years ago
20 Posts
|
My 65 Series IV had the fender mounted mirrors. They were almost useless as I remember, provided such a narrow view back.
These clamp on ones shown above are intriguing however. If they don't hit the body when door is closed or slammed shut, that might be a good way to go. Where did you find those mirrors?
These clamp on ones shown above are intriguing however. If they don't hit the body when door is closed or slammed shut, that might be a good way to go. Where did you find those mirrors?
|
Greenwood, SC, USA
Sign in to contact
1964 Sunbeam Alpine "Big Red GT"
1967 Sunbeam Alpine "Blue Boy" 1967 Sunbeam Alpine "Commodore Blue" |
May 8, 2022 09:17 AM
Joined 9 years ago
138 Posts
|
Thanks Richard, for a well written exercise on the 3:70 ring gear. Lots of good info in there for the next Guy.
DanR
Keep'em-on-the-Road
'67 SV Commodore Blue Restored & Modified 2.8 V6 FORD; T5; A/C; Electric Power Steering (EPS; REAR DISC BRAKE KIT
V6 CONVERSION COMPONENTS available & STRAIGHTBACK HEADERS for your V6 Alpine
Tiger2Dan’s Link: http://danr.mhartman.net/
PDF file on Converting your Alpine: Kits available
https://docs.google.com/document/d/13vKZ9JhB0vO8p2PrMl1x1qfCxh17xJIg_KCIo7HeFok/edit
?ts=5a51997d
|
|
May 14, 2022 09:46 PM
Joined 5 years ago
132 Posts
|

|
Gumby-Alpine
Richard Atherton
|
May 20, 2022 05:46 PM
Joined 4 years ago
20 Posts
|
This is the final update to the Series V rear end rebuild to swap into my 64 series IV car
The series V rear axle, as we know uses a much better wheel bearing with an integral oil seal on the inside and an o-ring on the outside. It also uses a different hub and axle, and has self adjusting brake, and cross over hard brake line from the right to the left, using only the left side bleed screw for the whole rear end. Parking brake attachment to the back of the axle housing is also different, and I will have to modify that later once it is in the car. These are, or were the known changes in production that I was fully aware of. Ahh but there was another unknown one.
After my son and I completed the assembling of the brake backing plates with the new wheel cylinders, brake shoes, and dust boots, I showed him the two slightly larger bolt holes used by the 2 dowel bolts used to hold and locate the plate on the axle. If you had read my previous remarks about this, I mentioned the fact that the dowel bolts were missing and regular bolts used in their place. Since the axle had been disassembled previously (Ooozed out silicone sealer on the diff gasket), I had assumed the previous owner had misplaced or lost them, and replaced them with regular bolts. In the process of swapping rear ends, I retained the dowel bolts from the series IV axle, to use here on the series V axle to correctly locate and secure the brake backing plate to the axle. The Brake Backing plate was designed and stamped to use them. And this is where the unknown production change was discovered. While the original backing plate stamping was retained with the dowel bolt holes present, the new dust cover was not stamped with the larger holes. On the series IV axle, the Dowel Bolts go through the dust cover, the oil seal retainer, the backing plate, and the Dowel shoulder portion of the bolt into a dowel pocket on the axle housing flange. I assume to reduce costs (Chrysler partial ownership by now), the drilling of the mounting holes on the flange no longer included the second step of drilling 3/4 the way through the 2 holes for the dowel portion to sit in. In the series V only manual, I found this statement in the rear axle over haul section. It said "There are no dowel bolts or dowel holes in this assembly".
This presented an engineering dilemma for me. As done by the factory for the series V, the proper locating and rotational shear force (brakes applied makes that backing plate want to spin with the wheels. All of that side shearing force is applied through the 5 mounting bolts) is only being applied through 3 of the 5 bolts. The two regular bolts going through the dowel sized holes will have no side contact on the plate itself. Do I do it the cheap Chrysler way, OR...Drill the dust cover for the dowel bolts (easy), and drill the axle housing flange 3/4 the way through ( requiring a bit of precision) to allow the dowel bolts to seat correctly, as they did in the series IV axle.....Got out my half inch power drill, and the 3/8" drill that matched the diameter of the dowel portion of the bolt, and drilled the holes. Now it has my own production change!. Now the backing plate is secured by two dowel bolts that can take the shear forces better than threaded bolts, and the other 3 regular bolts. All 5 will now take the shearing side load, as Rootes intended.
Hub installation went smoothly. I used my custom hub puller I made and attached it to the hub. BrakeKleen'ed both the axle's taper and the inner taper of the hub, and used a clean tac cloth to make sure they were both ready for final assembly. I tapped the new woodruff key into place. I used a shop propane heater about 5 feet away from the end of the bench where I had the hub with attached hub puller tool hanging on a hook, to warm it gently for about 15 minutes. The air temp was a cool 55 degrees F and the axle shaft was that cool, or cooler. Now that hub was warm, maybe 90-100 degrees F, I slid it on, added the big washer and new 3/4-16 Nyloc grade 8 nut, and hit with the the air powered zip gun for for about 20 seconds, then swapped the deep socket over the preset 180lb torque wrench, and torqued that nut quickly. I used the Hub Puller tool with it's 4 1/2" grade 8 studs sticking out to slide a big 3 foot long crowbar through to keep it from rotating while I applied the 180 pounds of torque. Worked perfectly. As the hub cools, it will squeeze that tapper press fit even tighter. It will not slip, and shear off the key and destroy the axle and the hub like I did in High school with my first Alpine back ion 1976. These parts are way to hard to find these days.
Axle is DONE...Drums painted red.
Next up, rebuilding the leaf springs with all new bushings, nylon tabs, and new rubber wraps. Only real concern is getting the old shackle bushing out of the rear frame of the car. THAT may take some work.
ErnestoV thanked Gumby-Alpine for this post
Having trouble posting or changing forum settings?
Read the Forum Help (FAQ) or click Contact Support at the bottom of the page.
